The instructions below detail how to add a customized document to HIBster.
For instructions on formatting a document so that it automatically includes information from the incident, click here.
For instructions on formatting a document so that it automatically includes information from the incident, click here.
Adding a new Incident Document to HIBster
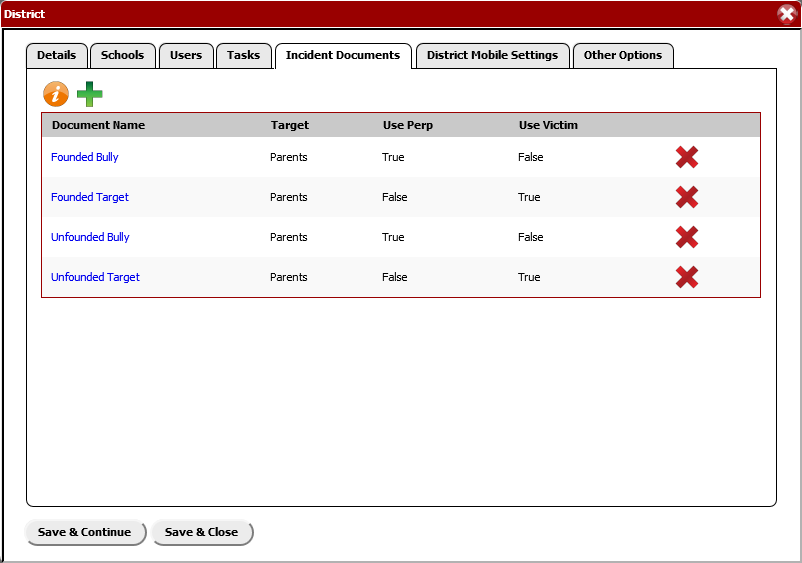
Log in as a System Administrator. Then click the System Settings icon (the gold-and-silver icon located in the red navigation bar).Click the tab named Incident Documents. This is where all of the different pieces of correspondence, including letters sent home to parents, are stored.

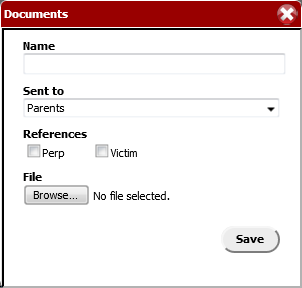
To add a new document, click the icon of the green plus sign. This will bring up a new window from which the document can be uploaded:

Make sure all three areas are accurately completed. To update any of them, the document will need to be deleted from HIBster and re-uploaded.
Name — Choose a name for your document. Make it as clear as possible; the name should explain who the document is for, who it involves and when it should be generated. For example, Parent Letter for Founded Victim after BoE Meeting should make plain the purpose of the document to all users.
Sent to — There are three choices here: Parents, State, Reference.
- Parents — For letters that will be sent home to the parents of students
- State — For documents or forms that will be submitted to the state
- Reference — For any type of paperwork that the school district would like to keep on file or be sent between staff members
References — There are two choices here: Perp or Victim. Both can be selected. If there are multiple perpetrators or victims in a given incident, the system needs to know which student to choose for the letter. This designation is very important; if it is skipped, incidents with multiple students will not be processed correctly.
File — Click the Browse... button to select the document from your computer and upload it to HIBster.
After all four areas are completed, click the Save button. The new document will now appear back in the Incident Documents list with all of the other documents.
Making changes to an Incident Document
It is not possible to make changes to a document while it is uploaded to HIBster. To make changes, the document needs to be downloaded to your computer.
Log in as a System Administrator. Then click the System Settings icon (the gold-and-silver icon located in the red navigation bar).
Click the tab named Incident Documents.
Find the document that needs edited; to download it, click the blue link with the name of the document. This will download a copy of the document to your computer.
Remember: there is now a copy of the document on HIBster and a copy on your computer. Once the document is safely downloaded to your computer, delete the copy stored on HIBster. See below for details on deleting a document from HIBster.
Open the document on your computer. Make the changes that need to be made and then save and close the document.
Repeat the steps listed above for uploading a document to HIBster.
It is probably a good idea to make sure the document is named the same thing as before; this way, other users will not be confused when looking for that document.
Deleting an Incident Document
Log in as a System Administrator. Then click the System Settings icon (the gold-and-silver icon located in the red navigation bar).
Click the tab named Incident Documents.
Find the document that needs edited.
To delete it, click the icon of the red X to the right of the document name. HIBster will ask if you are sure you want to delete the document. Confirm that the document should be deleted and it will then be removed from the account.
Using Variables
For in-depth instructions on properly formatting an Incident Document to take advantage of HIBster's variables, click here.
